BigCommerce Set Up Guide
Introduction
The Synchrony BigCommerce Extension enables easy integration of the Synchrony Payment product, which allows you to support customer credit applications and purchases online. All authorizations, captures, and refunds are processed through the BigCommerce payment gateway. Our extension allows customers to use Synchrony financing at checkout and complete their order seamlessly. Consumers can apply, be approved and Pay with Synchrony at Checkout in a seamless apply and buy flow.
Consumers with an existing Synchrony Credit Card on the merchant’s program, can choose to Pay with Synchrony, complete an account number lookup process, and use their account. Merchants will use their BigCommerce console to process the payment as part of their normal order flow. Shipping the product will capture the order payment details, and initiate funding for the order. Funding is completed within two business days once order is shipped.
About this document
This document provides the steps to integrate the Synchrony applications into an enrolled merchant’s BigCommerce eCommerce site.
Intended audience
This document is intended for the merchant and/or merchant development team to install the Synchrony Marketing and Payment Gateway applications, and to successfully use the applications for consumers to apply for and pay with Synchrony at checkout.
Terms and definitions
- Merchant: Merchant enrolled with Synchrony to provide financing and payment options.
- Merchant ID: A unique 16-digit identification number assigned to a merchant.
- Partner ID: A unique 10 alphanumeric code assigned to the partner.
- PDP: Product Display Page
- Widget: An element of a graphical user interface that displays information or provides a specific way for a user to interact with the operating system (OS) or an application.
- Authorization: The purchase was approved by Synchrony, and the merchant can prepare the merchandise for shipping.
- Captured: After the order is placed and approved by Synchrony Financing and when the order is shipped, the order is captured, and this begins the funding process, so the merchant gets paid.
Technical Support
For technical support related to the Synchrony Messaging or Payment Gateway applications, send an email to eCommerce@syf.com.
Integrating Synchrony App
The high-level steps to integrate the Synchrony App are as shown.
-

-
Log into your Store Admin Console.
-
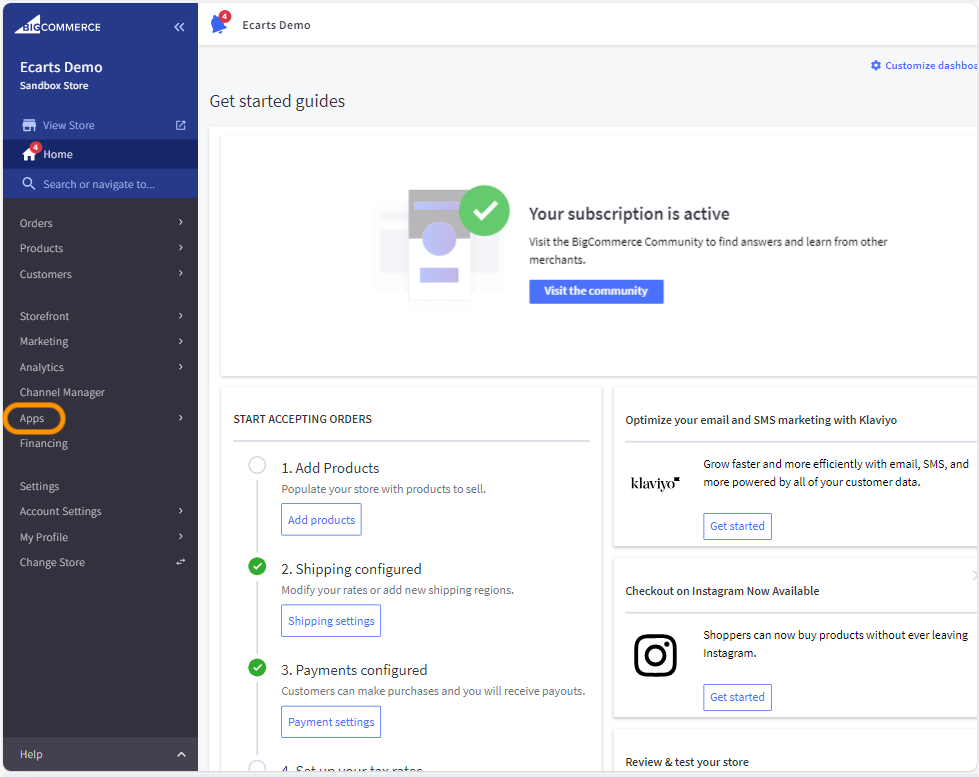
Click Apps -> Marketplace.
-
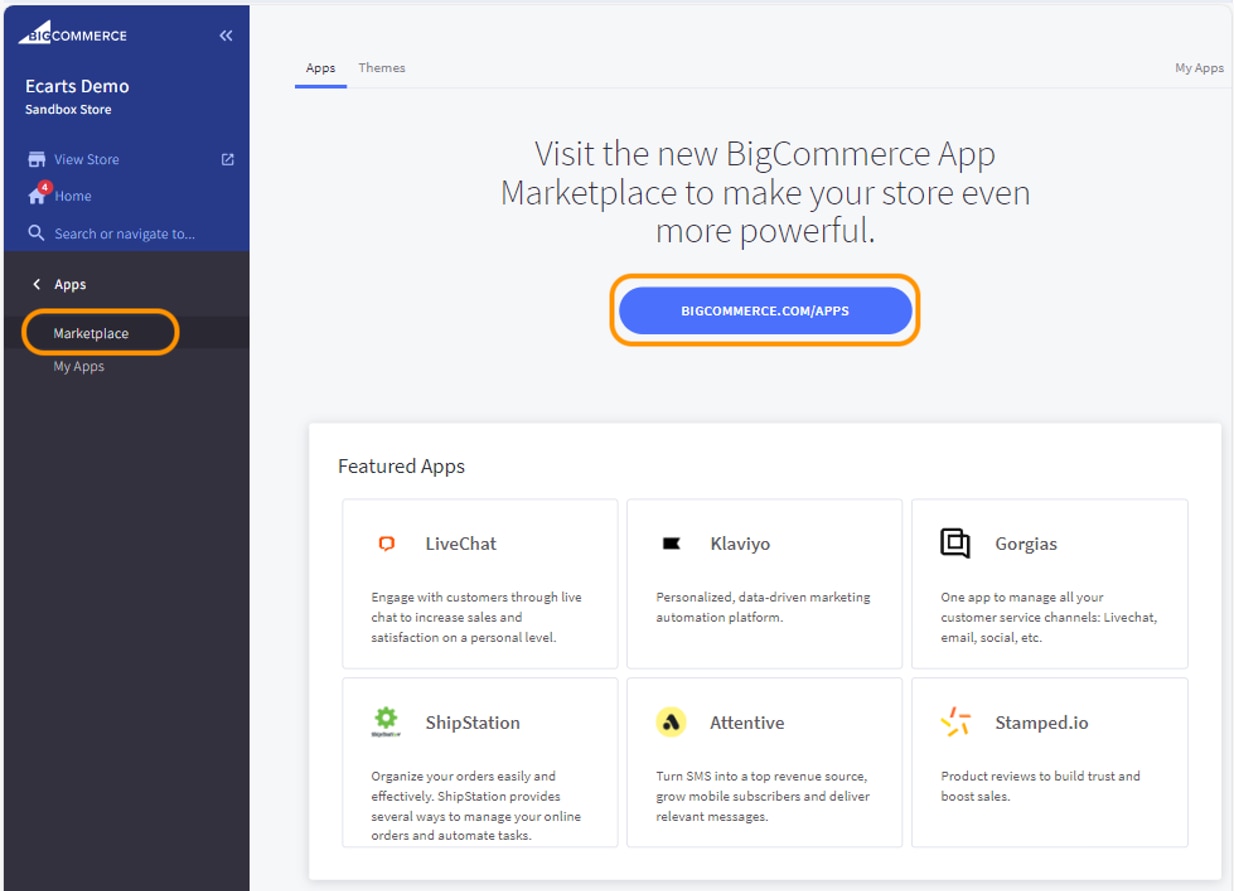
Click BIGCOMMERCE.COM/APPS button. This will open BigCommerce market place in new tab.
-
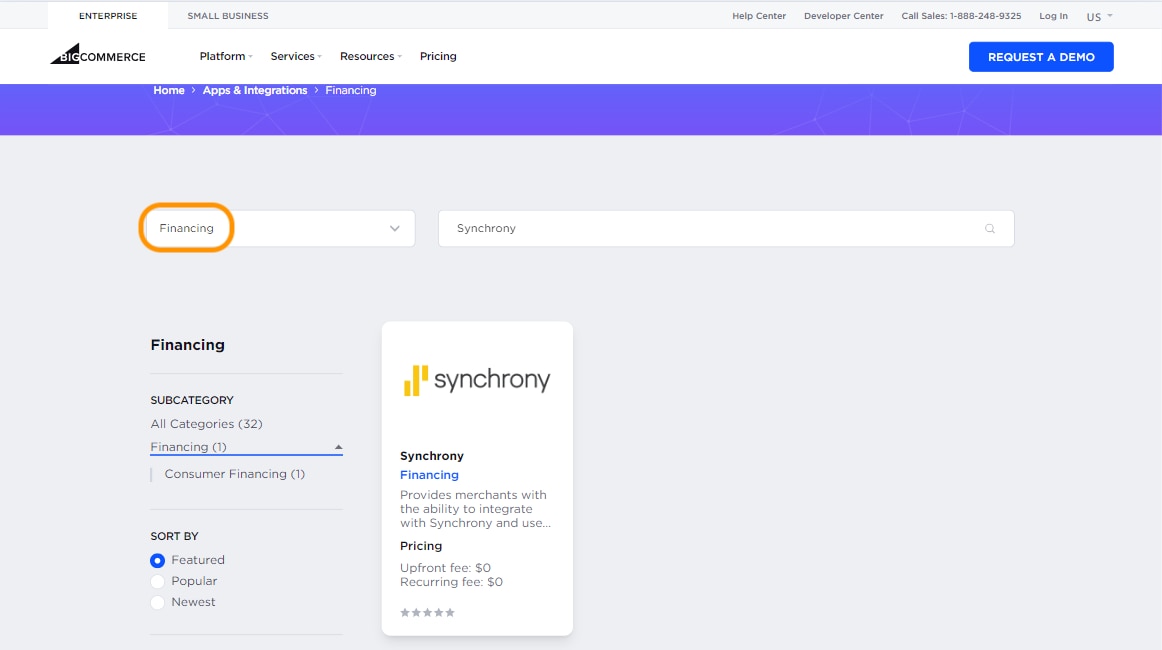
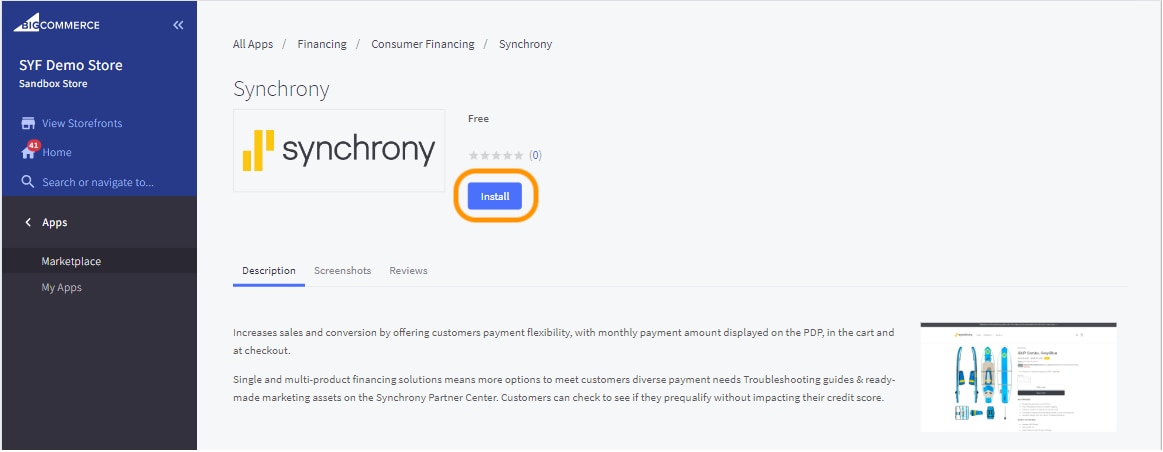
Select Financing from the Categories dropdown and enter Synchrony in search. Click on Synchrony App.
-
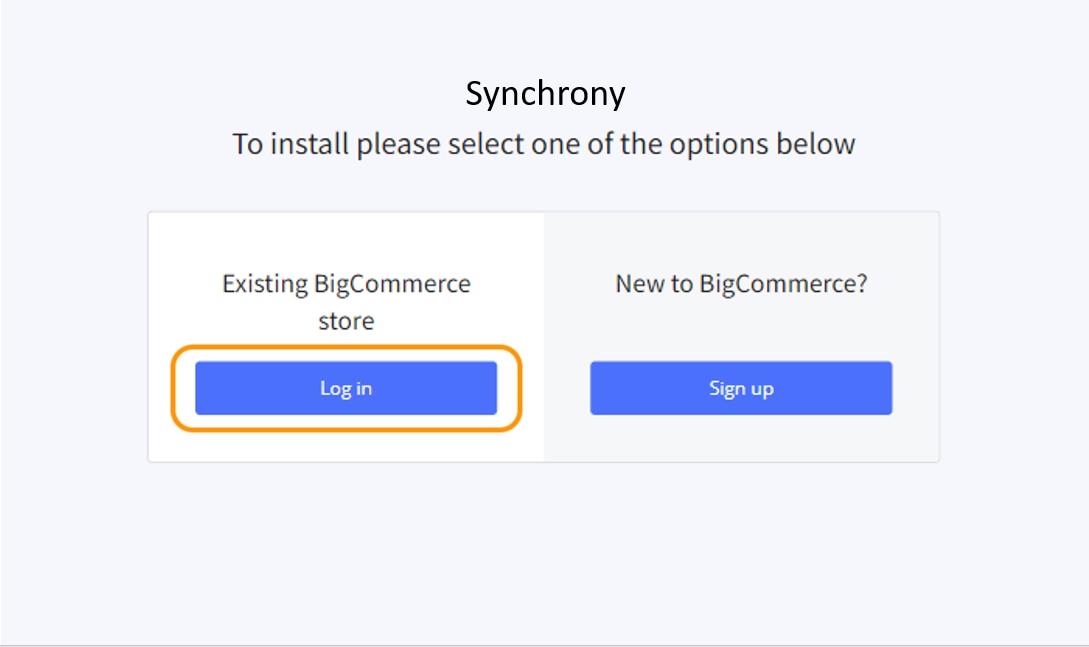
Click on Log in on Existing BigCommerce store.
-
Login with store admin email and password. The Synchrony App page is displayed.
-
Click the Install button.
-
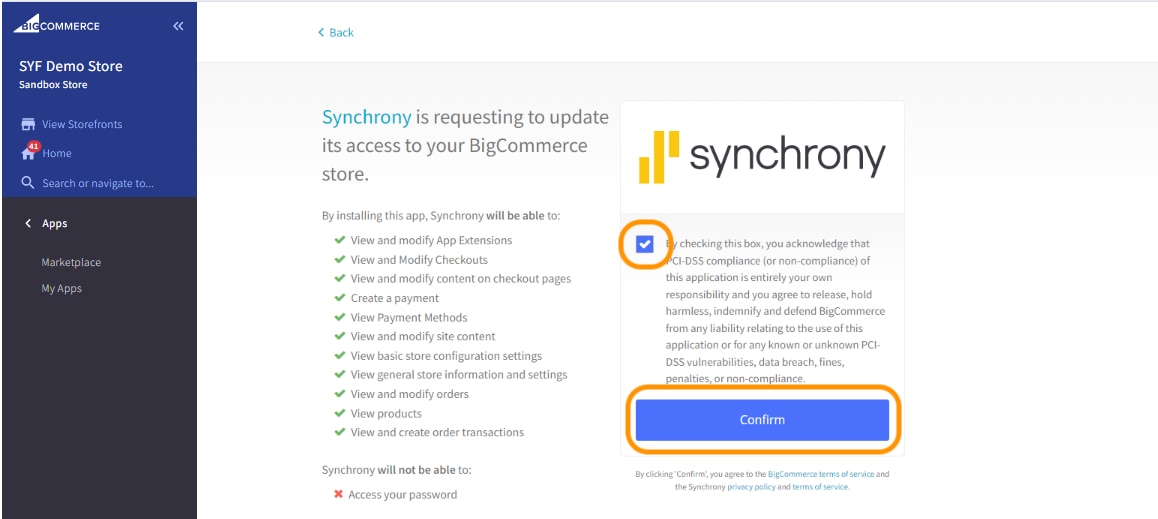
Select the checkbox to acknowledge compliance and click Confirm button.
-
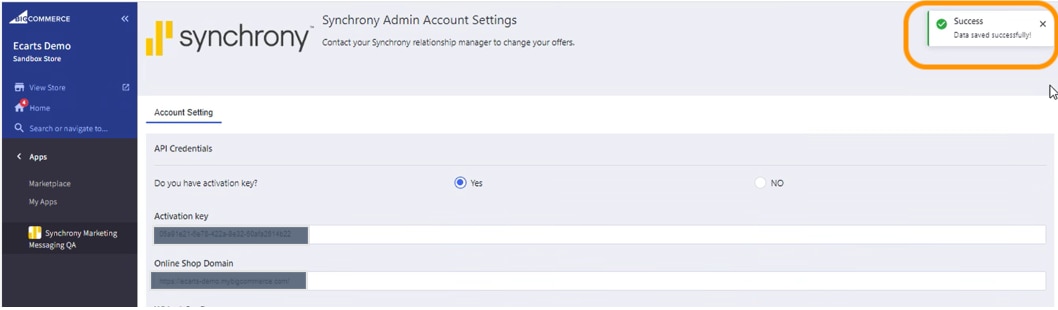
Synchrony Admin Account Setting is displayed.
-
Account Settings
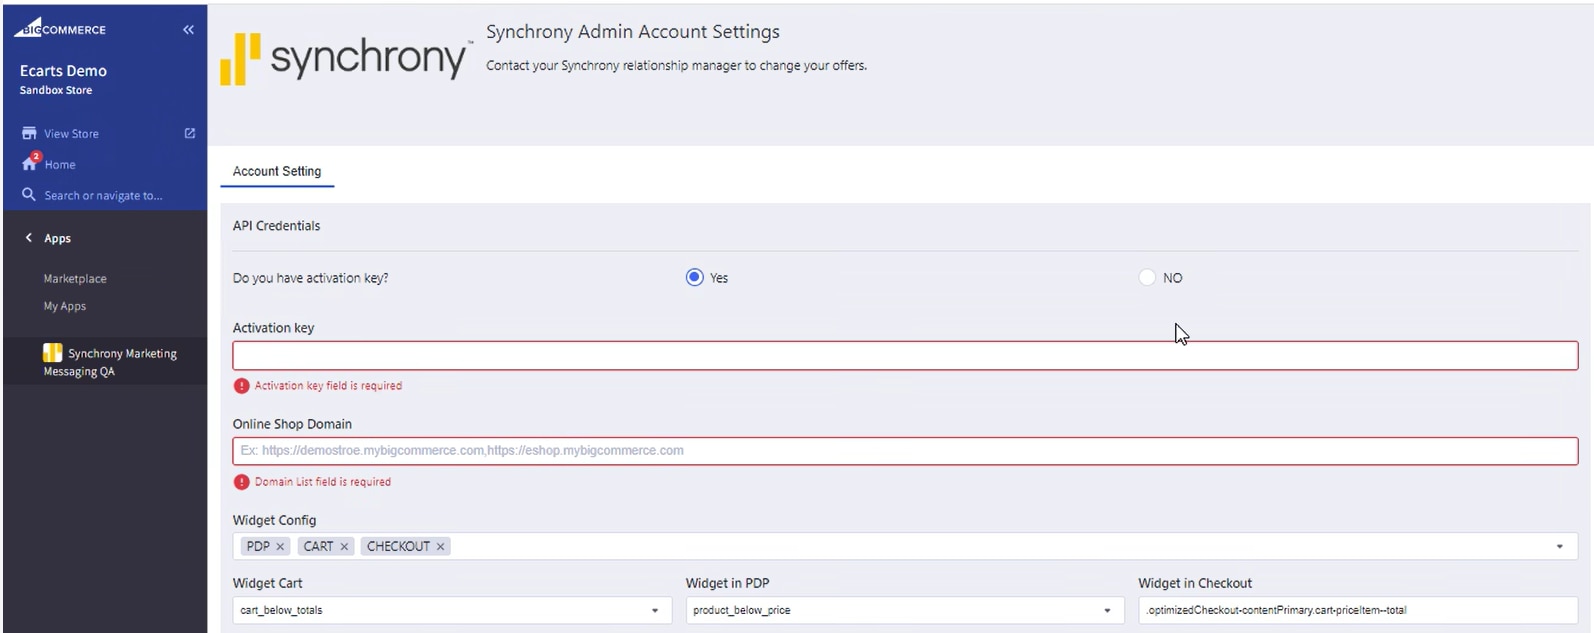
- Do you have activation key (Yes/No): By default, it is set to Yes.
- Activation Key: Enter activation key (provided in a separate email to business principal).
- Online Shop Domain: Enter all domains used by your eCommerce site. BigCommerce merchants may have more than one domain, for example https://mystore.com,https://mystore.mybigcommerce.com,https://mystore.us.
- Widget Config: Recommended not to change this setting. This will display the monthly financing price on PDP, CART and CHECKOUT page.
- PDP – Display Unifi Widget only on the Product Display Page.
- CART- Display Unifi Widget only on Cart page.
- CHECKOUT – Display Unifi Widget only on Checkout page.
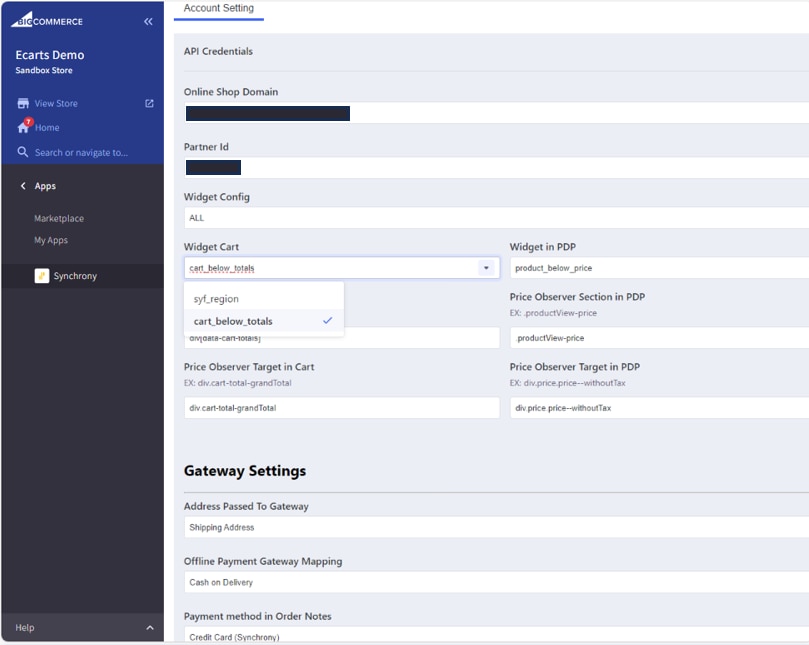
- Widget Cart: Keep the default value. If you need to display the widget at unique location within the Cart web page, pick desired region from the dropdown. Follow the instructions under Widget Placement section to add new region.
- Widget in PDP: Keep the default value. If you need to display the widget at unique location within the PDP web page, pick desired region from the dropdown. Follow the instructions under Widget Placement section to add new region.
- Widget in Checkout: Keep the default value.
It is critical that these domains are accurate, or your extension will not work. Separate domains with a comma, and don’t leave any spaces.
-
Click on Save Setting button.
-
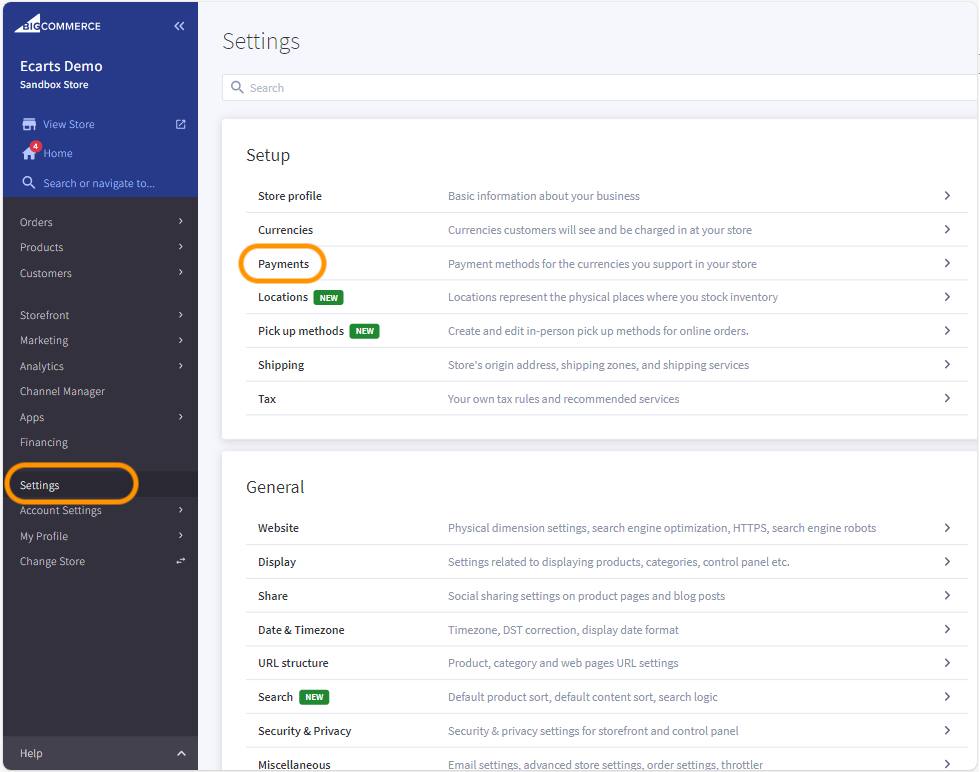
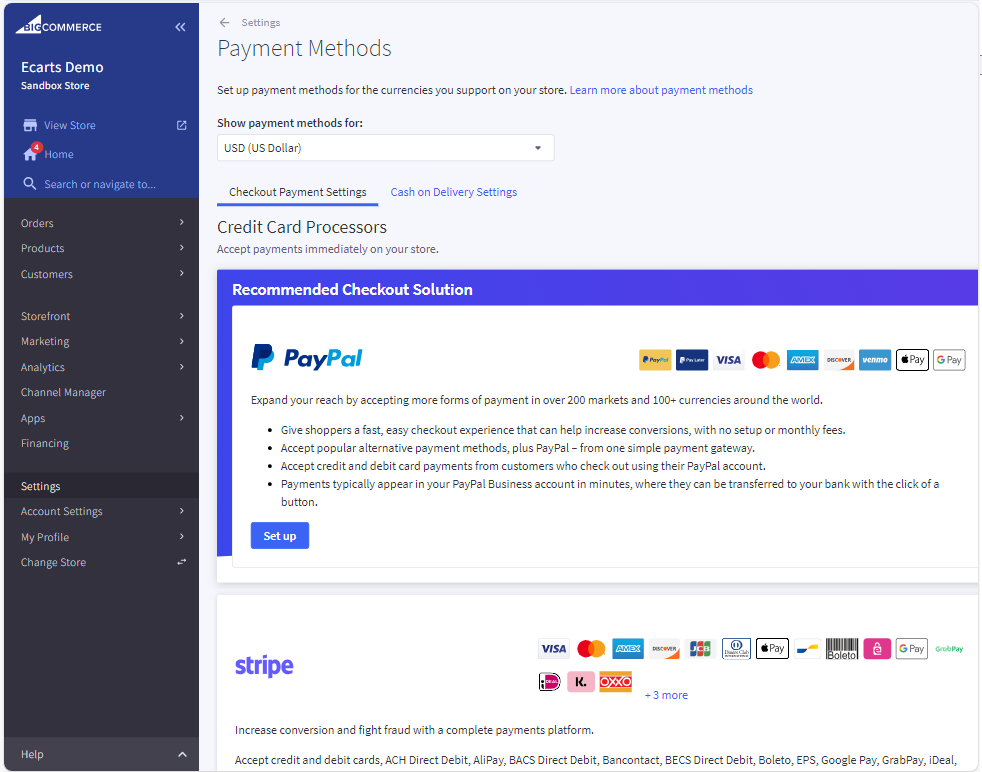
Go to Settings -> Payments
-
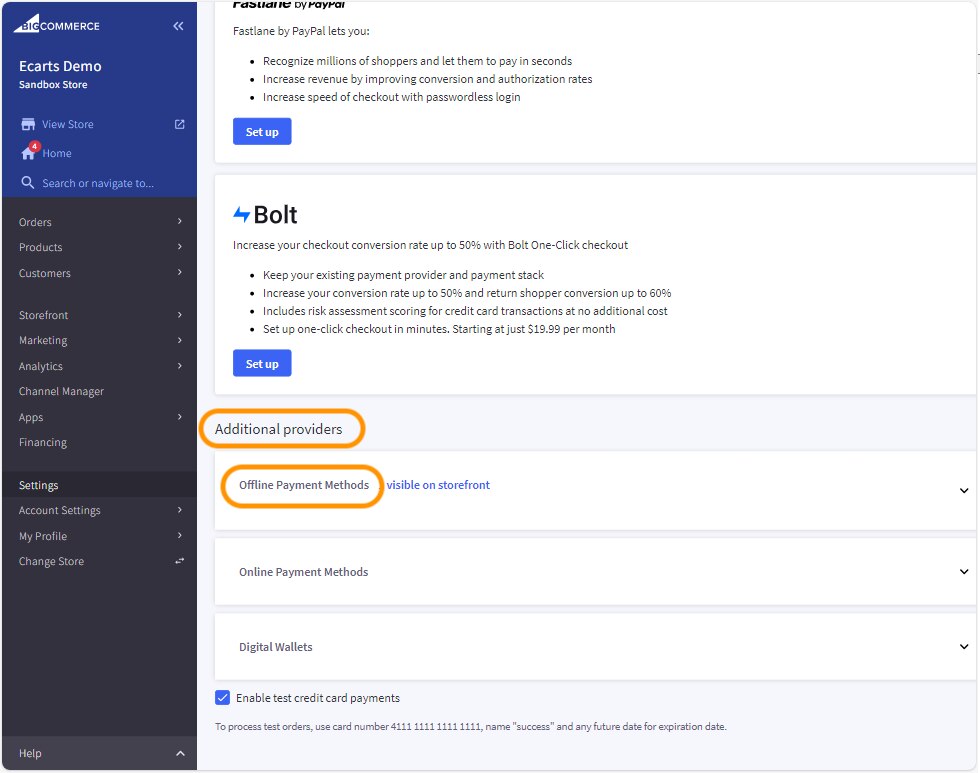
Scroll down to the end. Go to Additional providers section.
-
Additional Providers > Click on Offline Payment Method
-
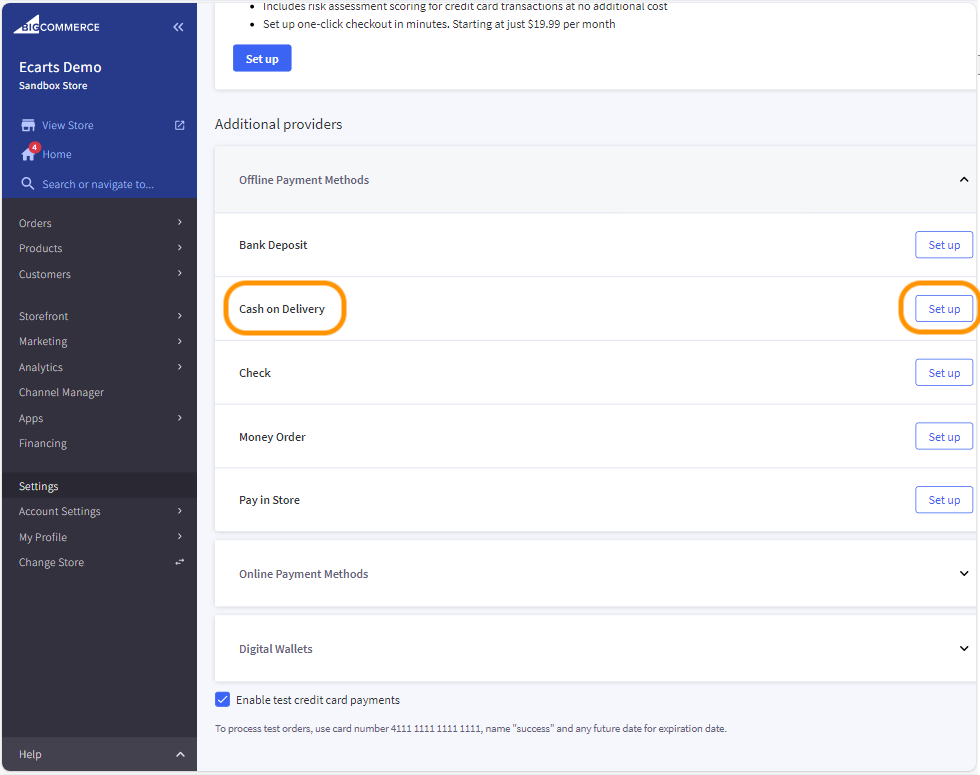
Setup any one of the unused payment methods to overwrite as Synchrony Payment method.
For example merchant doesn’t provide Cash on Delivery option to their customers. The Cash on Delivery option is unused and can be overwritten with Synchrony Payment. Click on Set up.
-
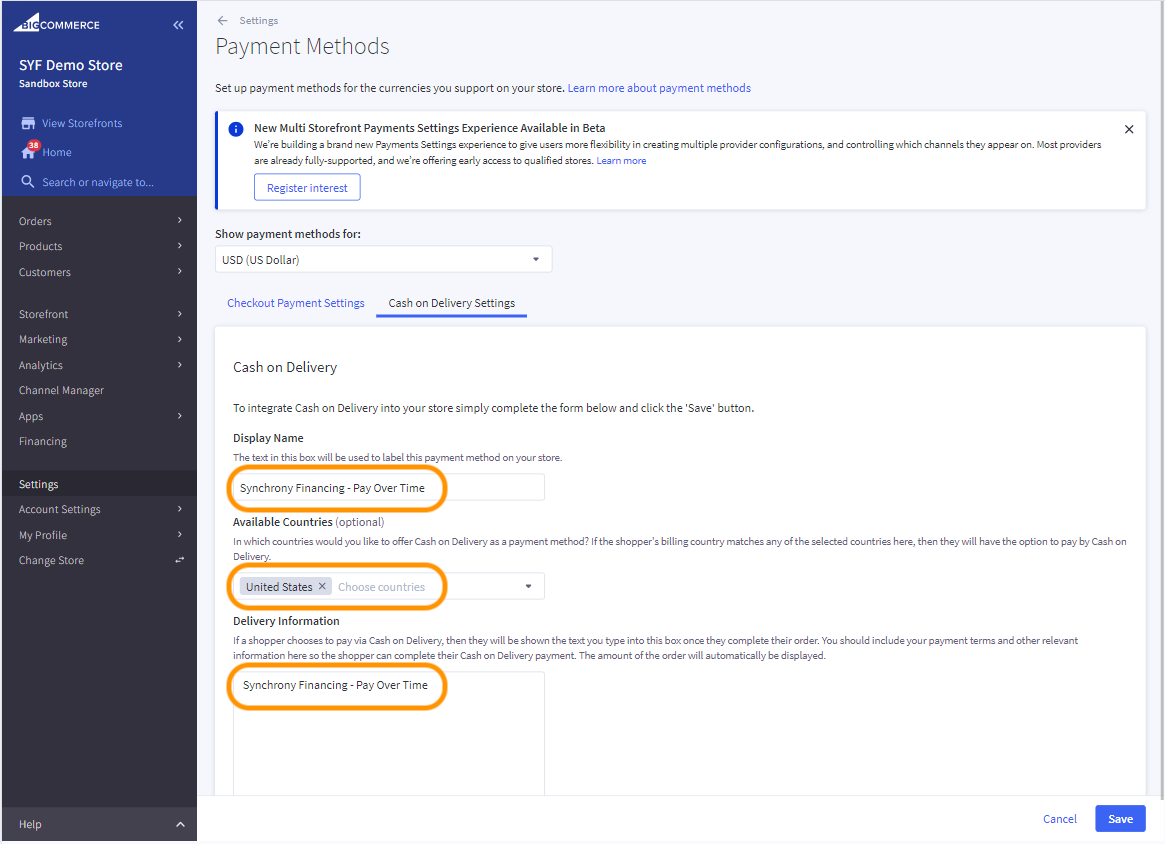
Edit the Display Name with Synchrony Financing - Pay Over Time.
Available Countries: Select United States only.
Delivery Information: Enter “Synchrony Financing - Pay Over Time”.
Click on Save button.
-
-
Go to Apps -> Synchrony Marketing Messaging
-
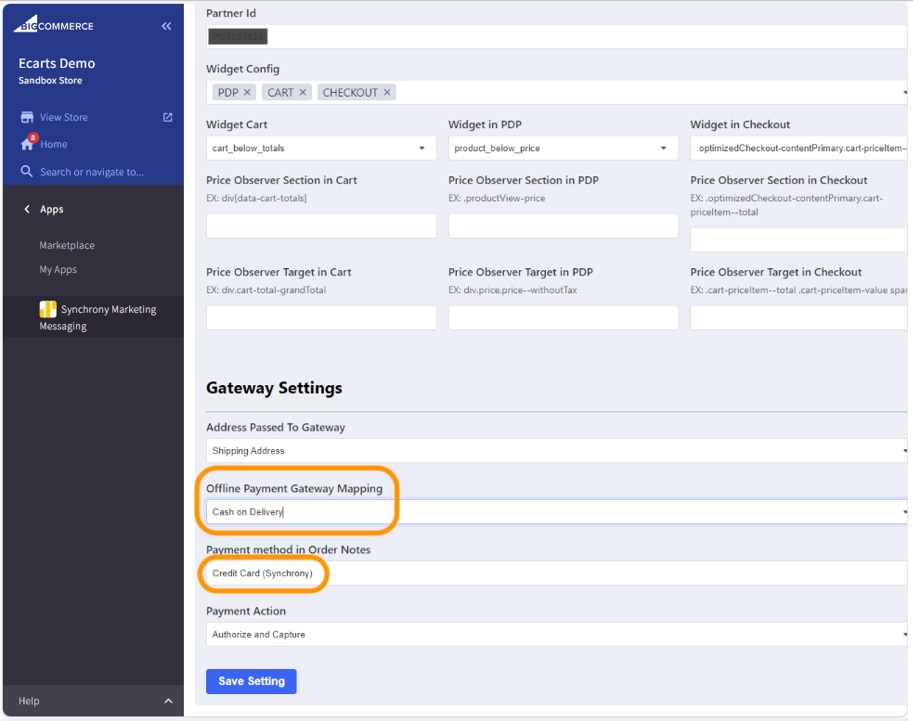
Select Cash on Delivery from Offline Payment Gateway Mapping. Update the Payment method in Order Notes as Credit Card (Synchrony). If a different unused Payment method was selected, then you will use that name in the Payment Gateway Mapping.
-
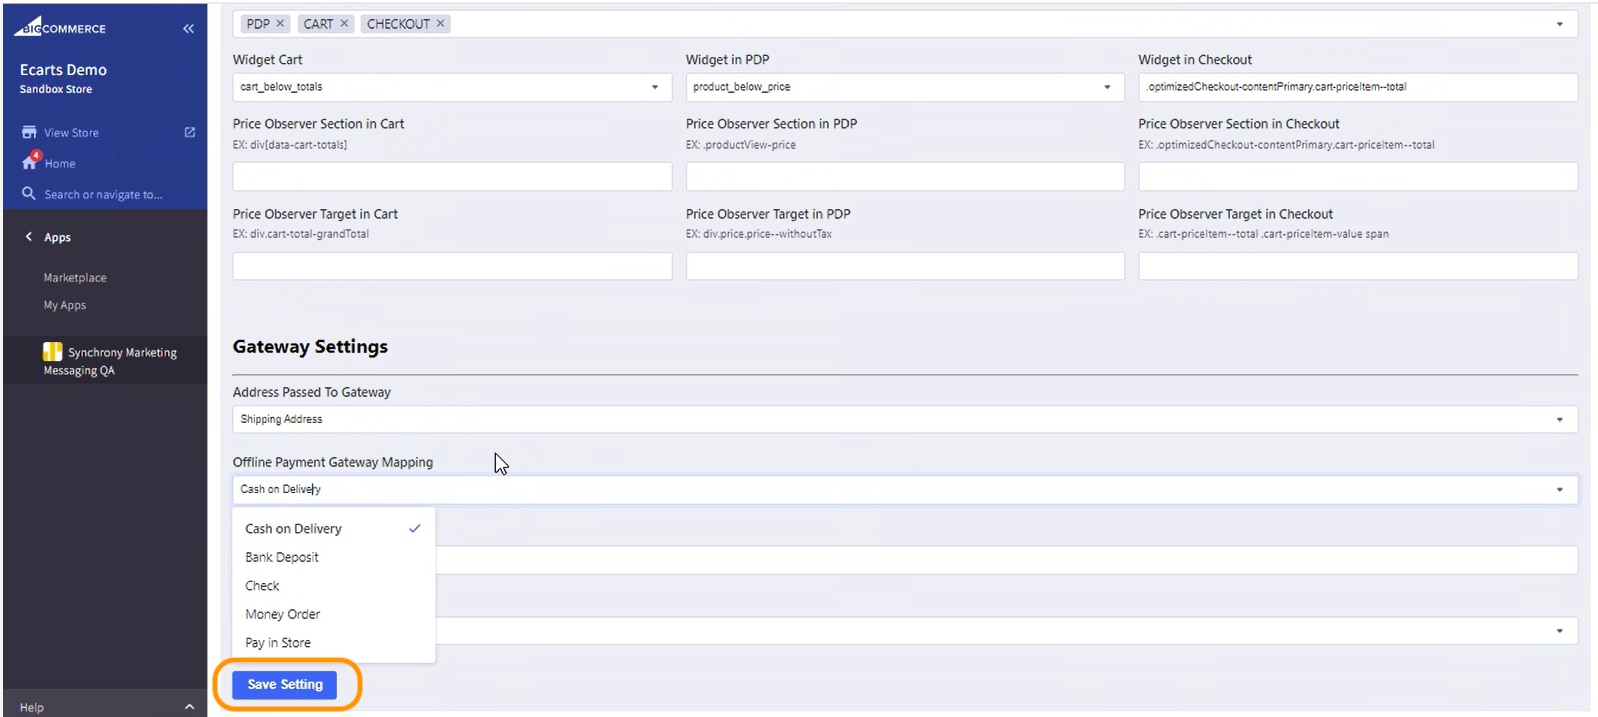
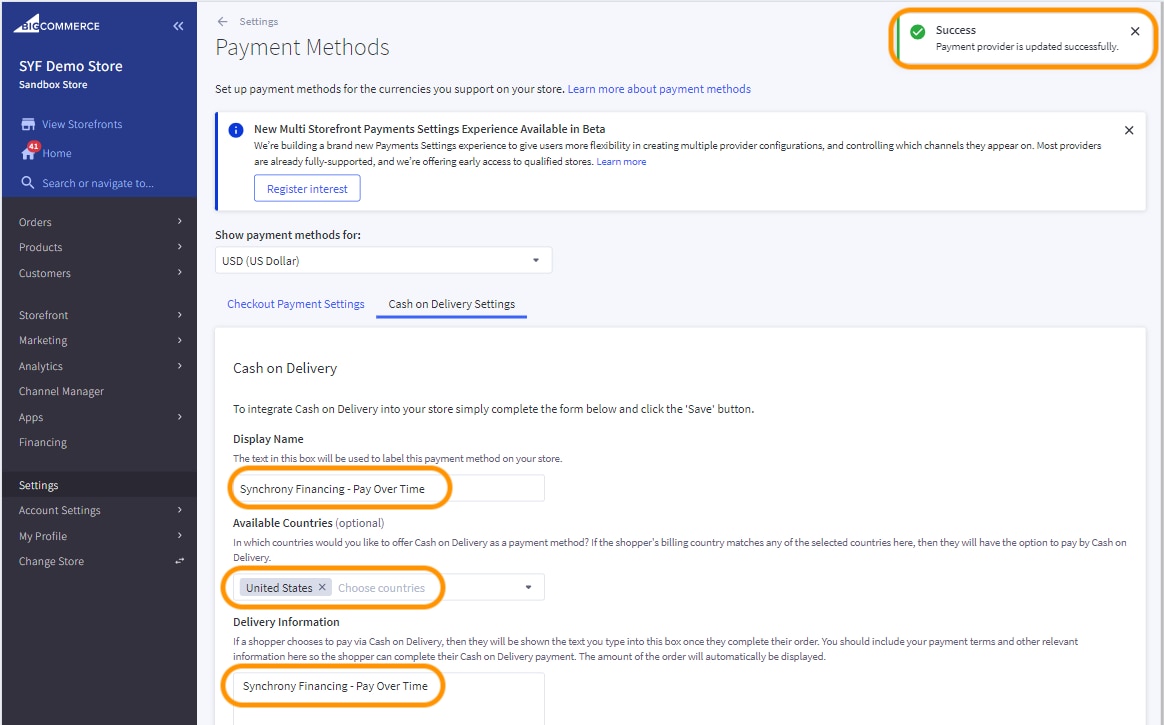
Click on Save Setting.
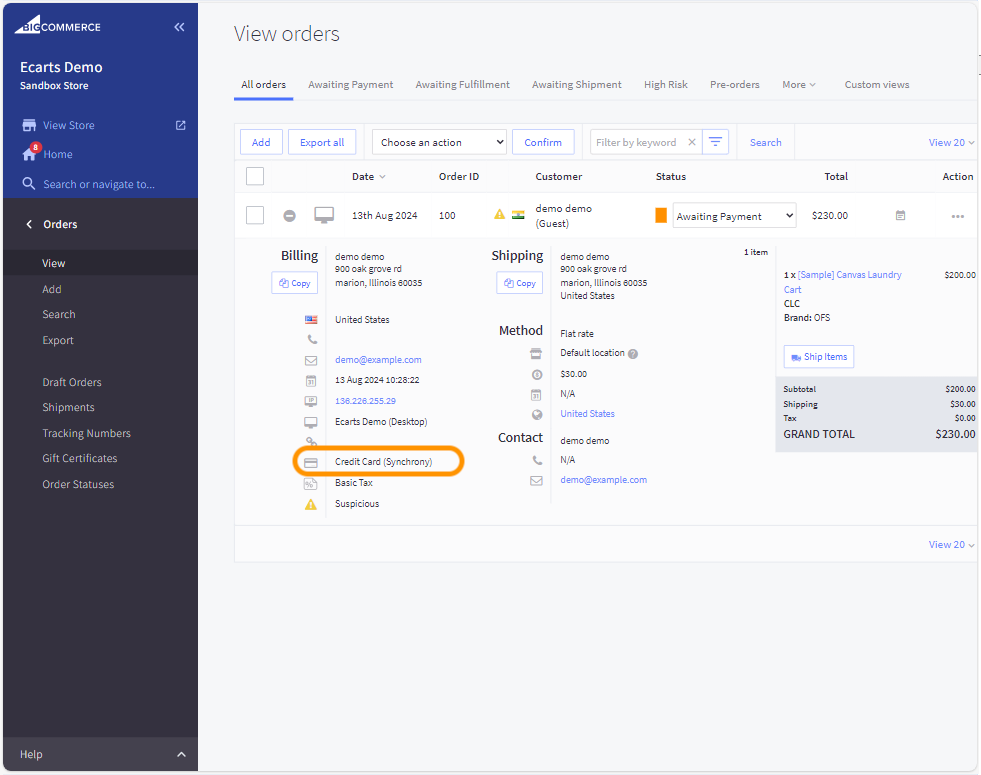
Credit Card (Synchrony) will appear as payment method in orders.
Widget Placement Setting
BigCommerce allows you to add regions for widget placement. Regions are specific locations in the Stencil theme template files where you can place a widget. You can add a region at the file level using the format {{{region name="..."}}} and name the region however you like, but it is best practice to give it a name that is descriptive of the location and function. For example {{{region name="syf_region"}}}.
You’ll be creating {{{region name="syf_region"}}} to display the Synchrony widget on the PDP and/or Cart page.
-

-
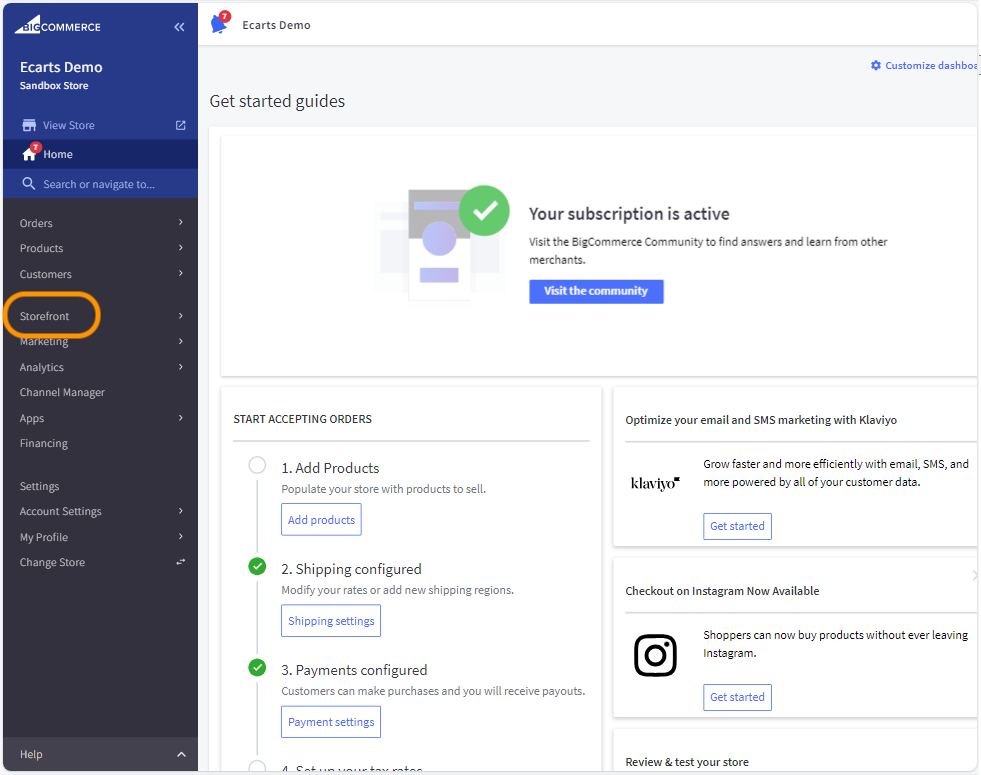
Click on Storefront.
-
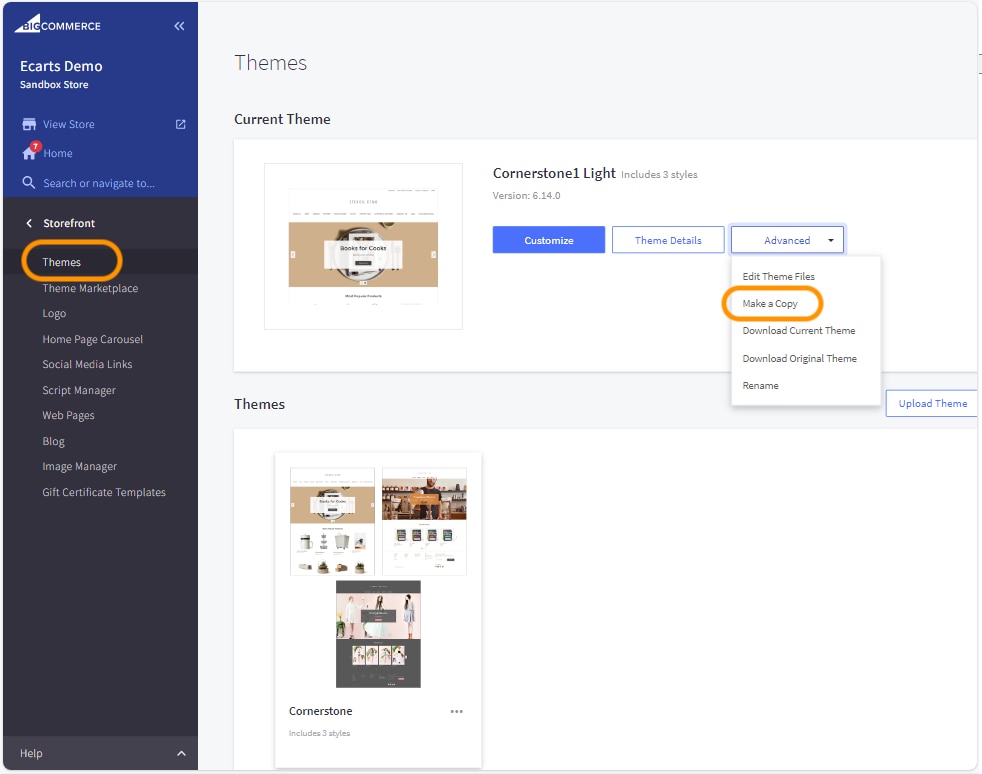
Click on Themes > Select Make a Copy from Advanced dropdown.
-
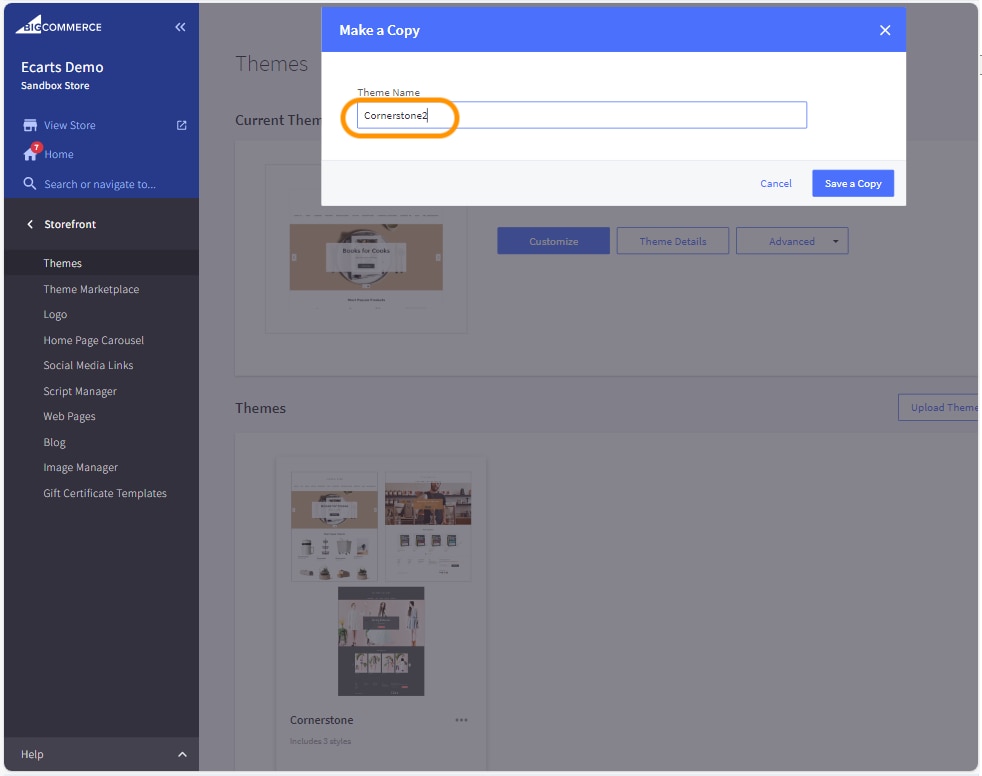
Enter the desired Theme Name and click on Save a Copy button.
-
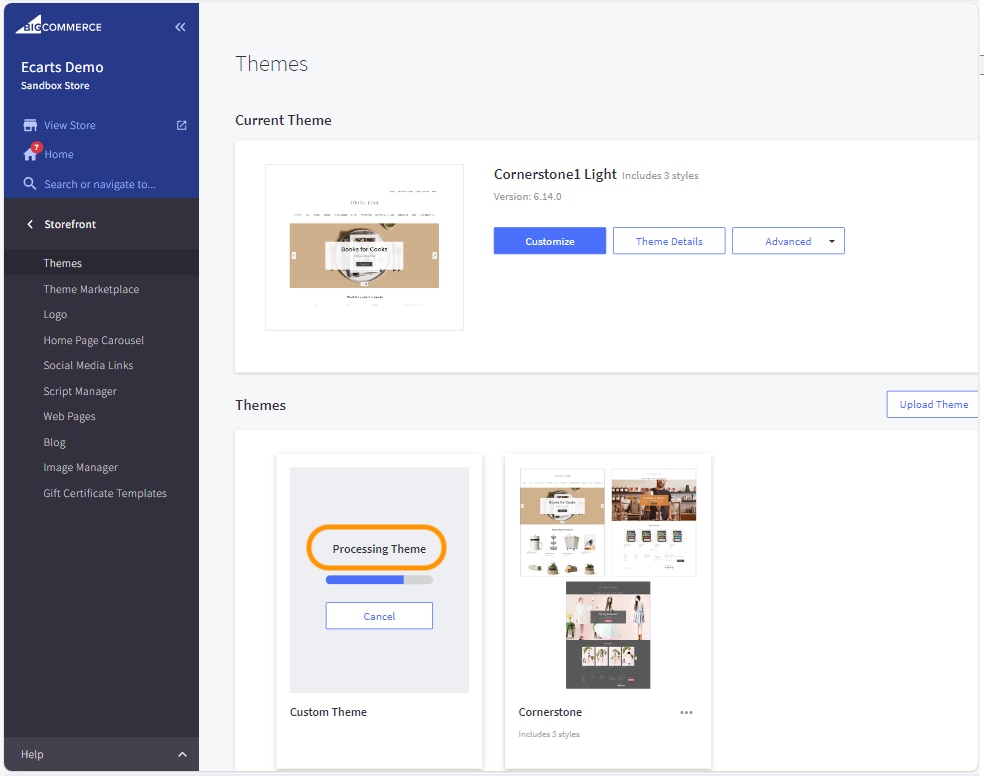
Processing Theme will display. Page will auto refresh once process completed. Given theme name page will display.
-
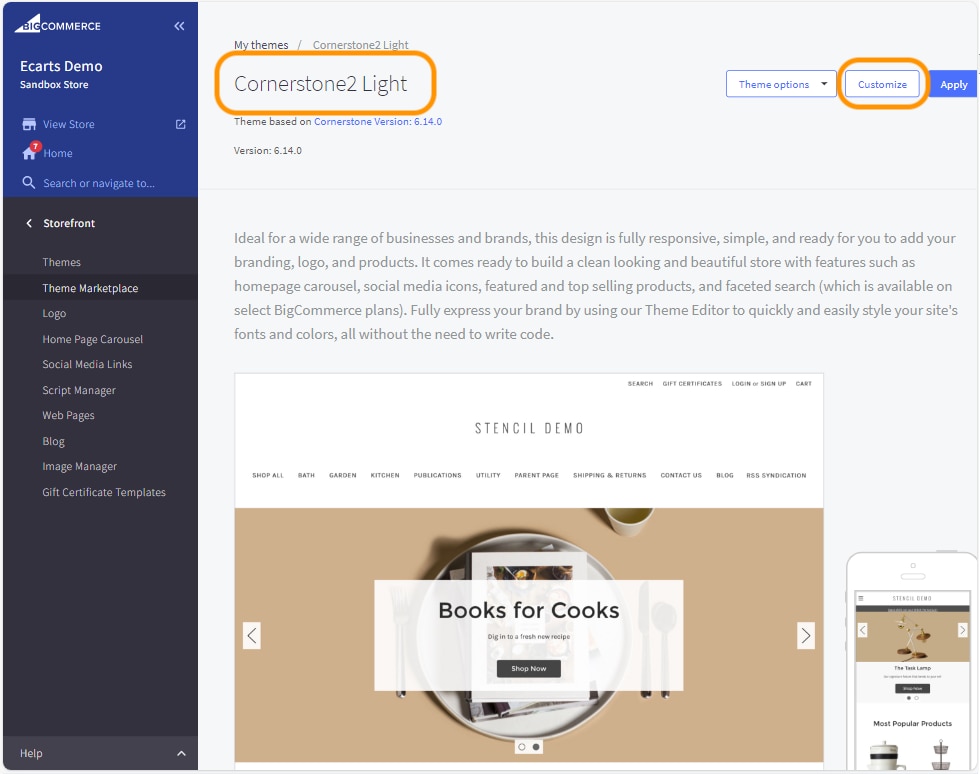
Click on Customize button. Page Builder page will display.
-
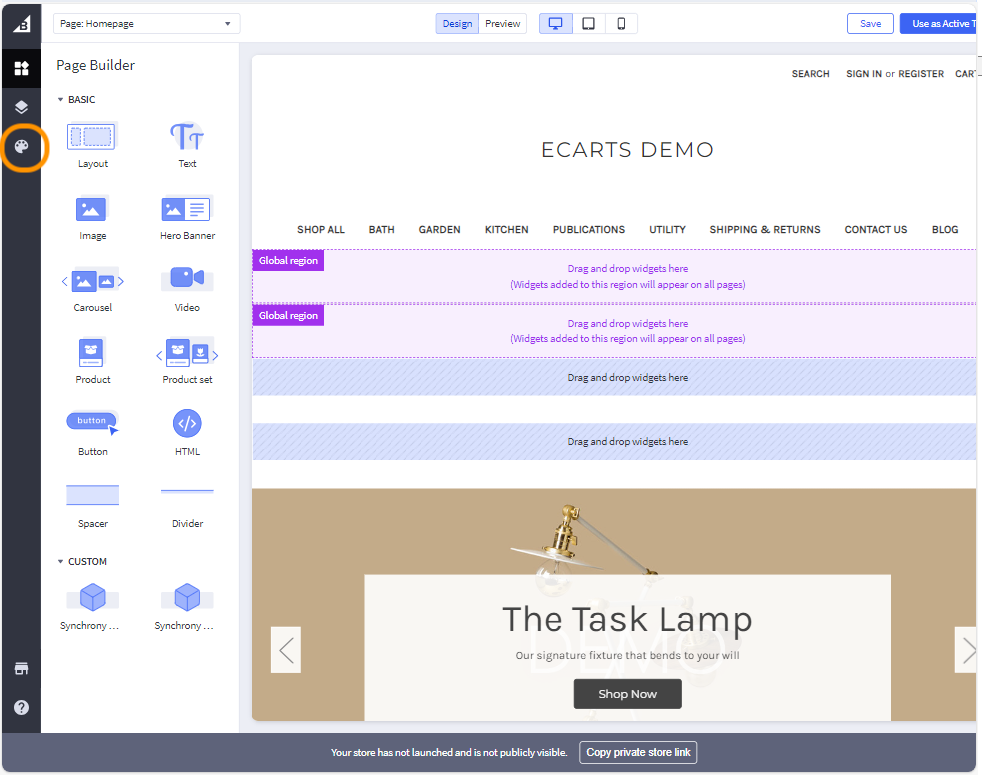
Click on Theme Styles menu from left navigation bar. Theme Styles page will display.
-

Click on Edit Theme Files.
-
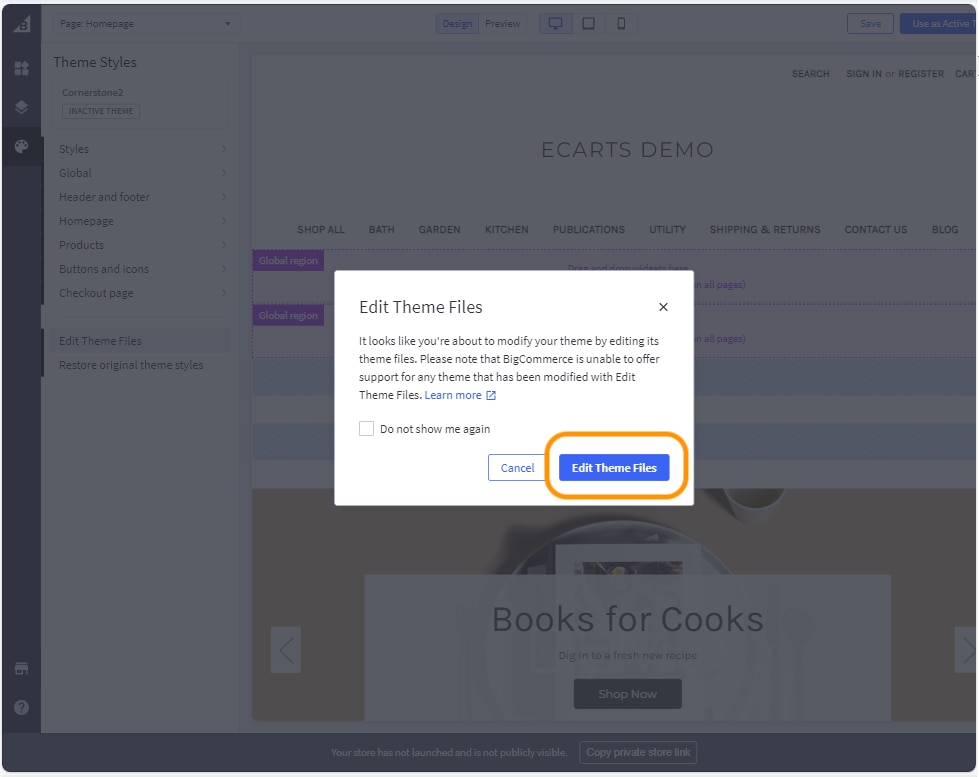
Click on Edit Theme Files button. By default home file will display in edit mode.

-
Go to templates > pages > click on product.html.
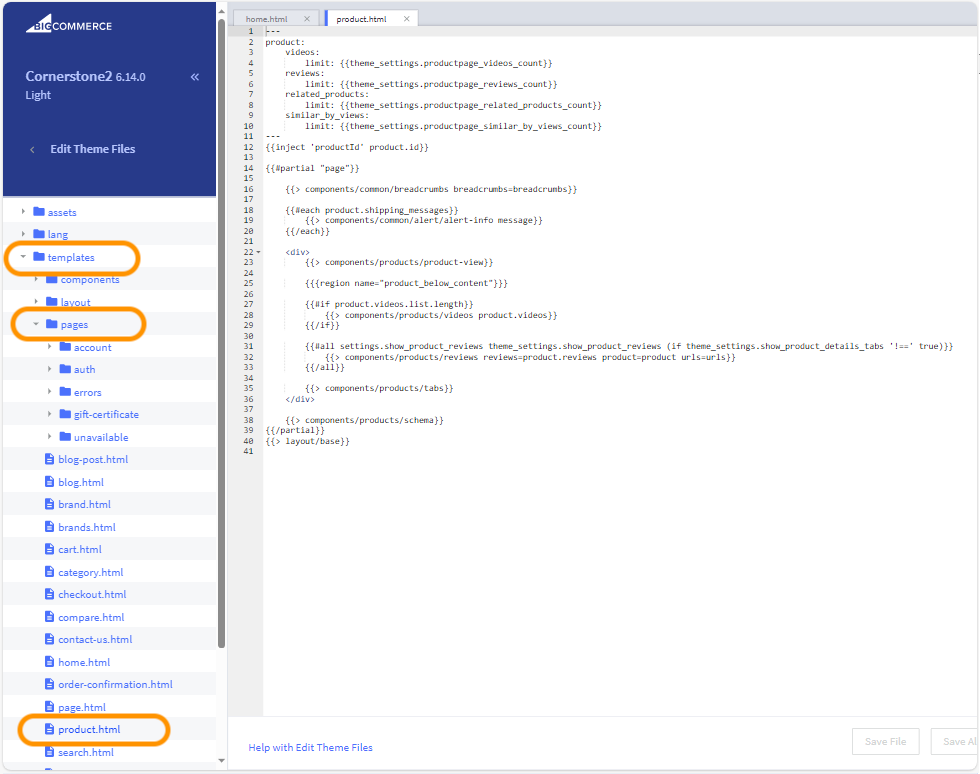
Note: The Cornerstone theme has defined a region at line 25
{{{region name="product_below_content"}}} -
If you want to display the Synchrony widget below the product title, go to templates > components > products > click on product-view.html. Define the Synchrony region by adding
{{{region name="syf_region"}}}.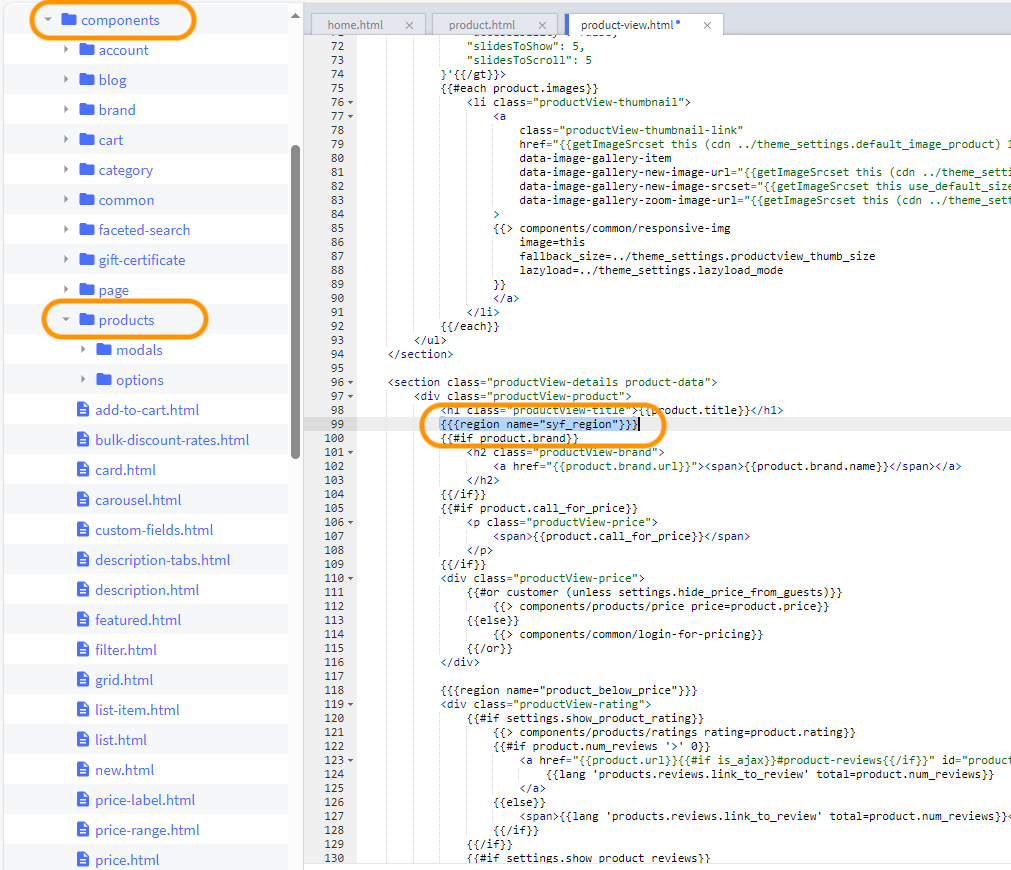
-
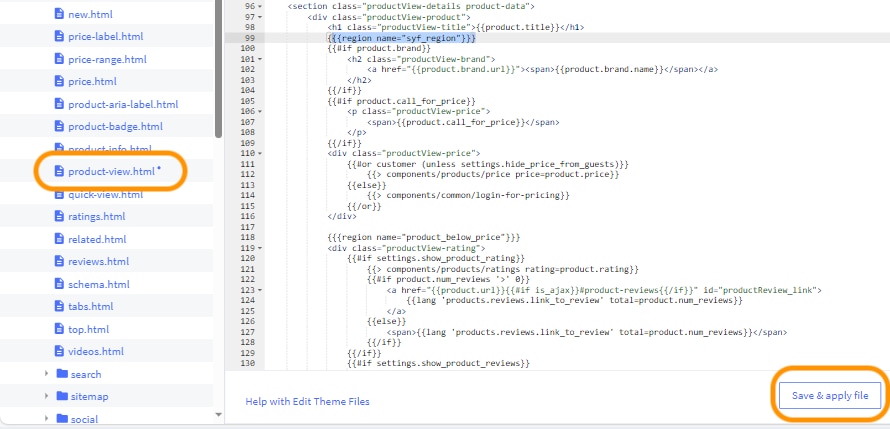
Click on Save & apply file button.
-
Click on BIGCOMMERCE dashboard link on top left corner to exit Theme Styles.
-
Click on Apps > Synchrony > click on Widget in PDP dropdown. New syf_region has been added.
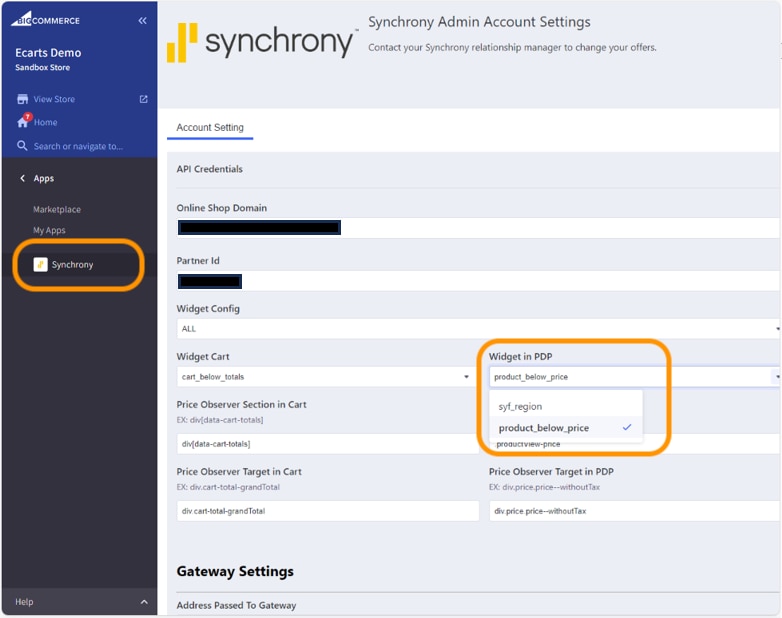
-
If you select syf_region, Synchrony widget will display after the product title.
Similarly you can add new Synchrony region in cart page.
-
Go to templates > pages > cart.html. Add
{{{region name="syf_region"}}}at desired location.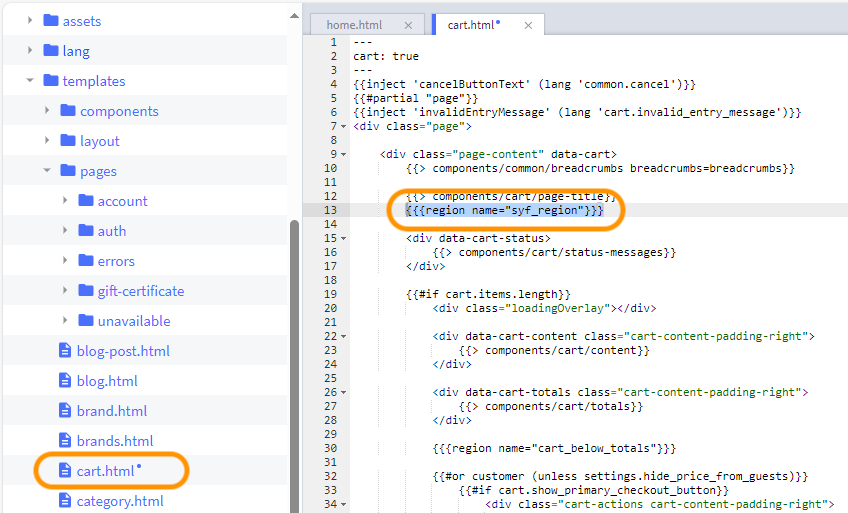
-
Click on Save & apply file button.
-
Click on BIGCOMMERCE dashboard link on top left corner to exit Theme Styles.
-
Click on Apps > Synchrony > Click on Widget Cart dropdown. New syf_region has been added.
-
If you select syf_region and Save Setting, Synchrony widget will display after the Cart title.

Synchrony Widget: cart_below_totals

Synchrony Widget: syf_region
Product Price Variance Setting
Following fields are used to set the price variance.
- Price Observer Section in Cart: Enter Parent element ID or class name of the price block section on Checkout/Cart page.
- Price Target Section in Cart: Enter the unique element ID or class name to display the price on Checkout/Cart page.
- Price Observer Section in PDP: Enter Parent element ID or class name of the price block section on Product Display Page.
- Price Target Section in PDP: Enter the unique element ID or class name to display the price on Product Display Page.
Notes:
- The last three parameters are the style sheet IDs, or the actual IDs grabbed from the merchant website.
- Click Save. The configuration settings are saved.
Promotions
Promotions are financing offers, such as 6 months deferred interest. Each promotion has a cost, which is expressed as the Merchant Discount Rate. This Merchant Discount Rate is subtracted from the funded amount of the purchase, and this amount represents the cost of financing provided by Synchrony. Merchants cannot pass on the cost of financing to consumers. Available promotions are determined by Synchrony.
The Merchant Discount Rate is determined by the Product Solution selected during enrollment. If you would like to discuss other Product Solution sets, please contact Synchrony at 800-333-1082 or email us at eCommerce@syf.com
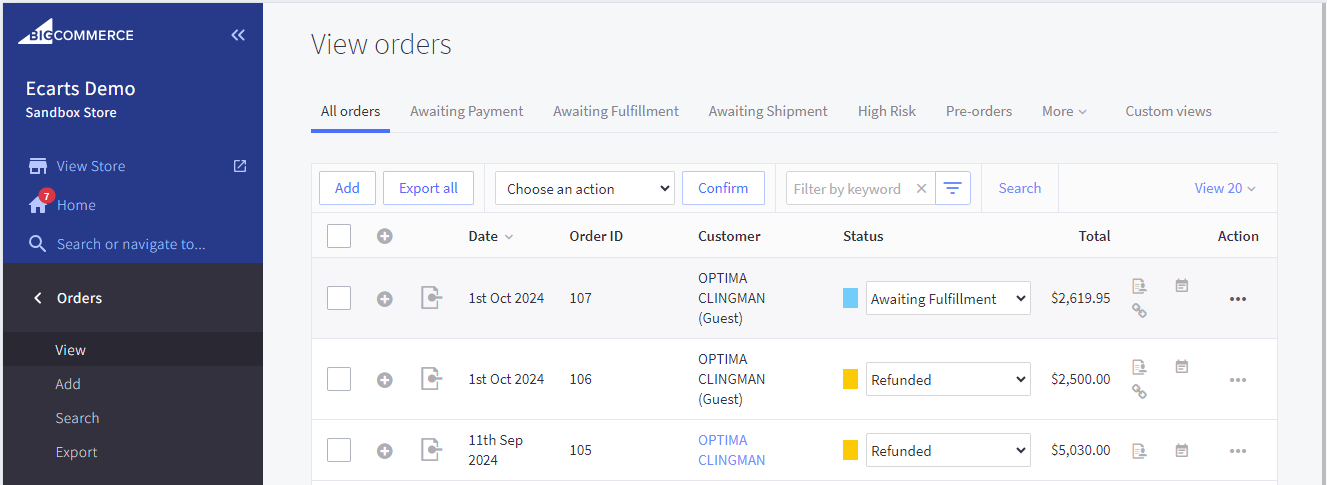
Synchrony Refund Option
-
Login to BigCommerce admin console.
-
Click on Orders
-
Click on the ellipsis (3 dots) menu under the Action column.
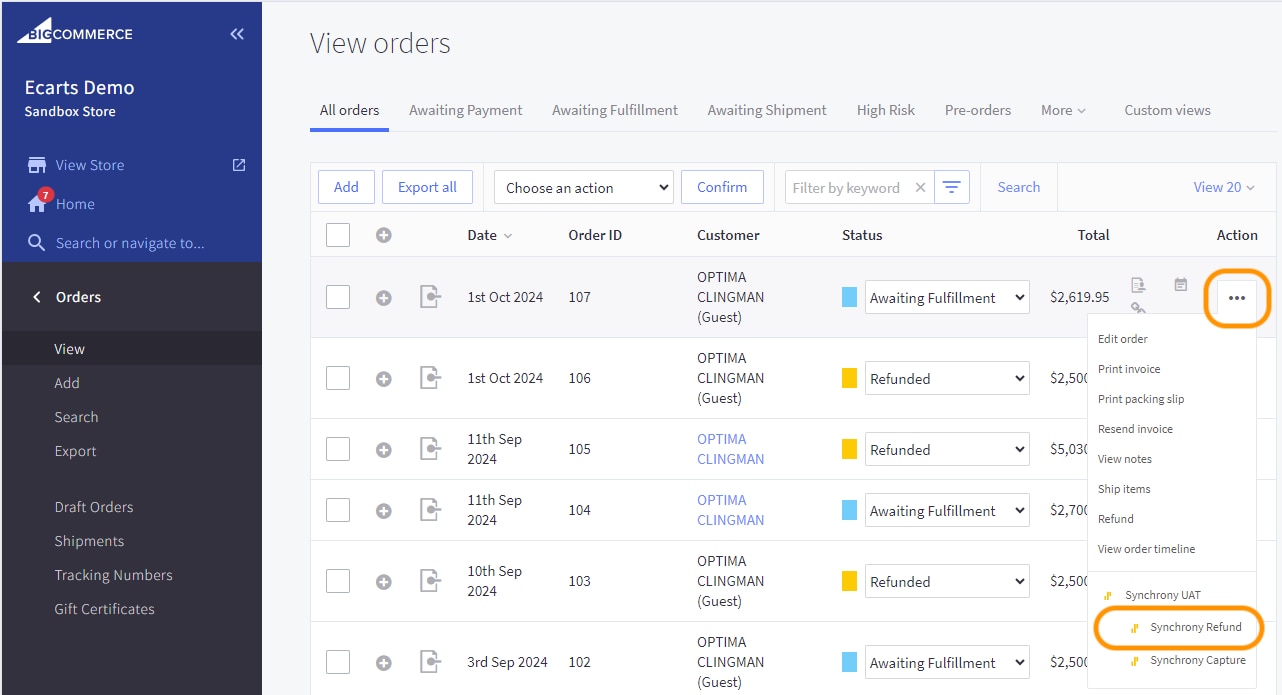
Click Synchrony Refund
-
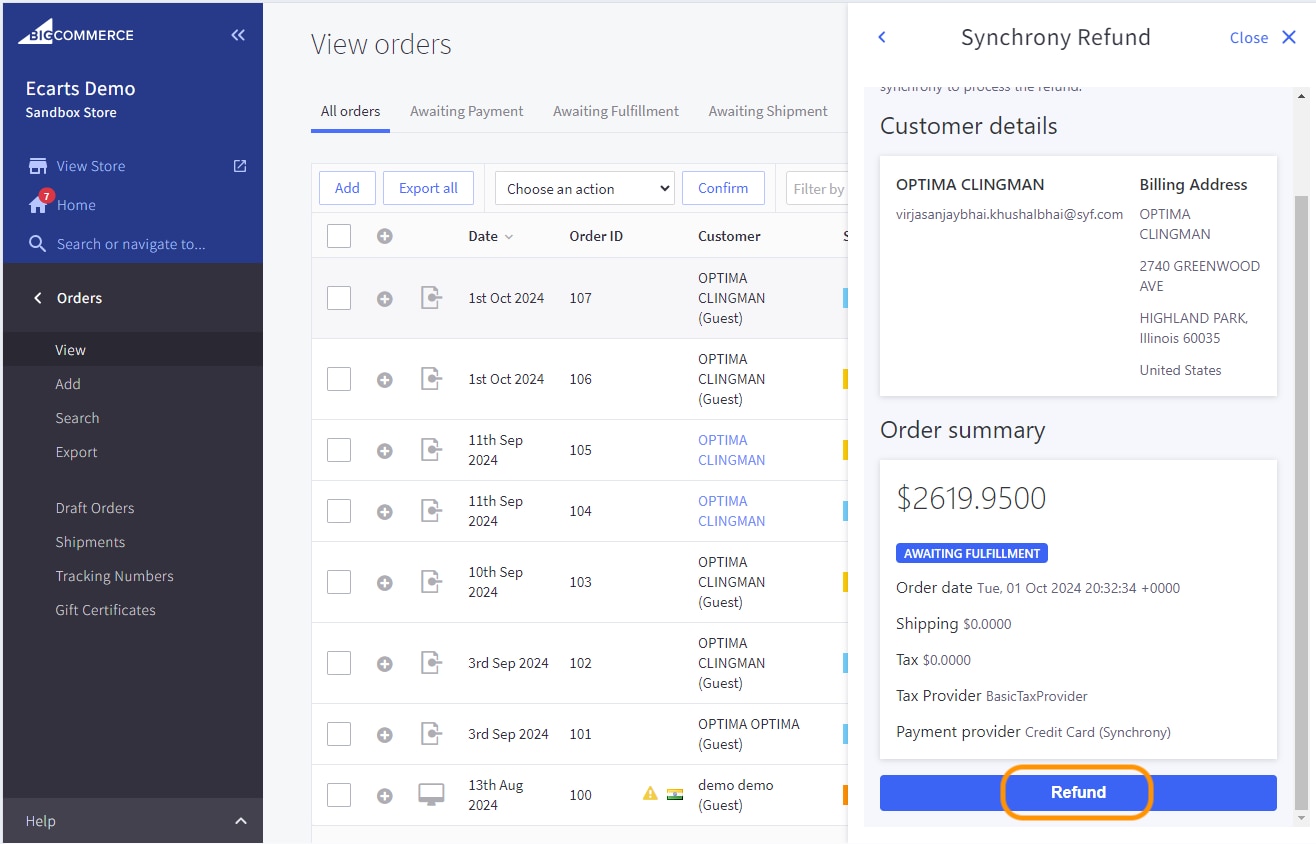
Order Summary is displayed. Click on Refund button.
-
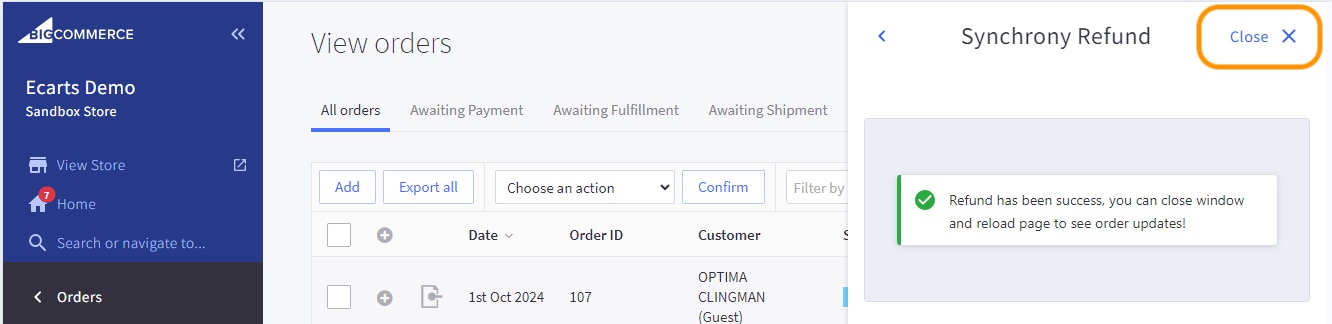
Refund success message is displayed. Click on Close and refresh the page.
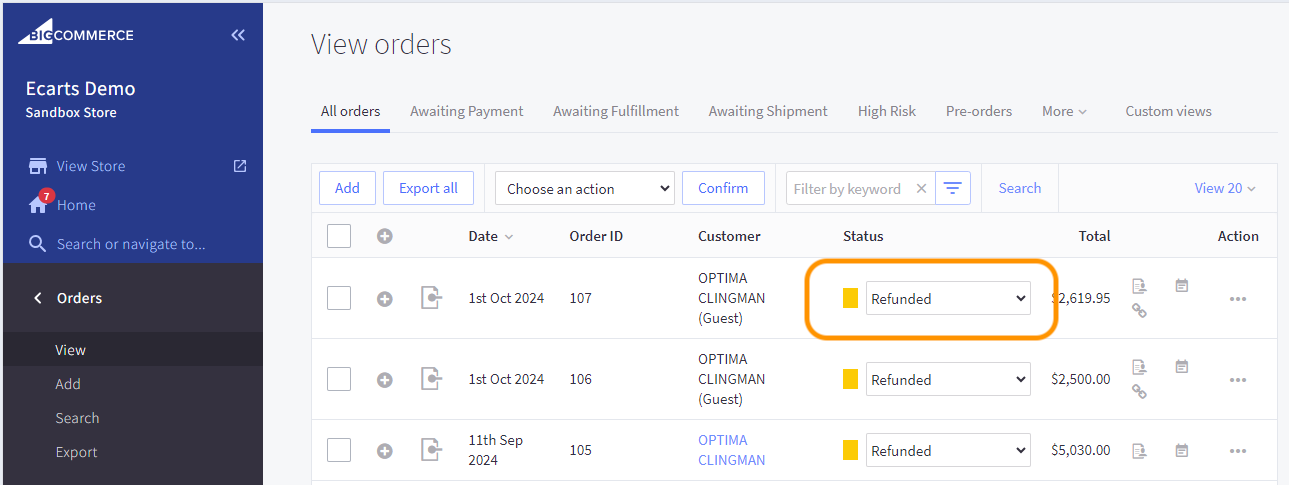
Status will change to Refunded.
Change Offline Payment Method Mapping
If you need to enable the offline payment method which was overridden with Synchrony payment, follow below steps. You have overridden Cash on Delivery. Now you want to change it to Bank Deposit.
-
Go to Settings -> Payments
-
Scroll down to the end. Go to Additional providers section.
Additional Providers > Click on Offline Payment Method
-
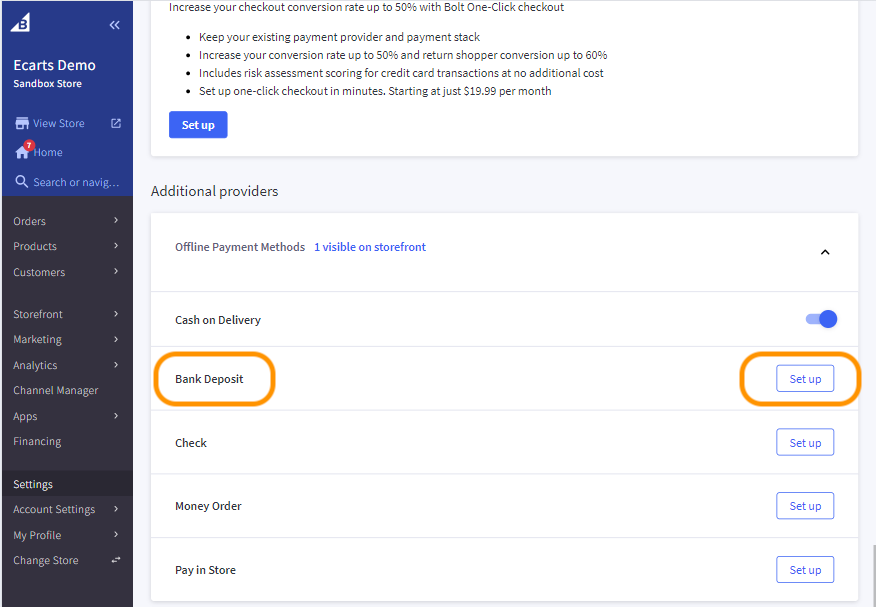
Click on Set up button for Bank Deposit.
-
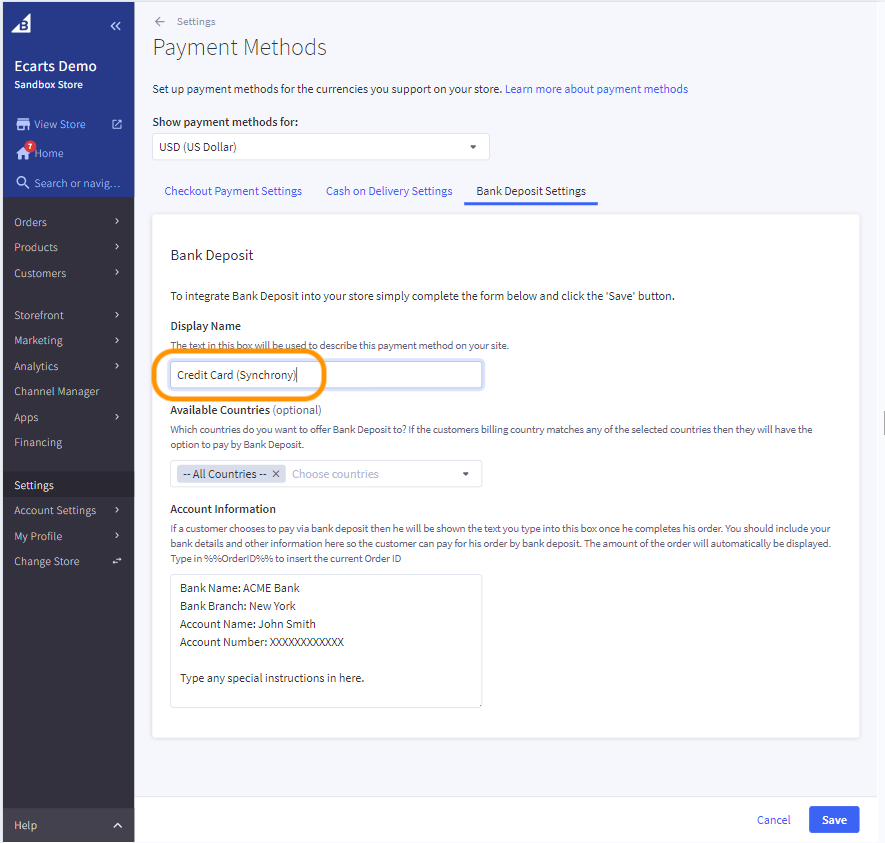
Edit the Display Name with Credit Card (Synchrony). Click on Save button.
-
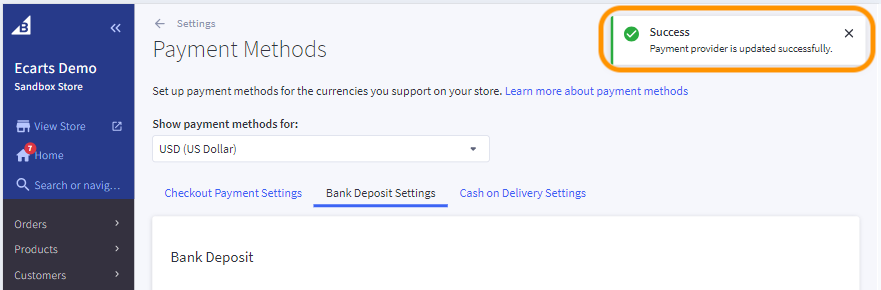
Success message is displayed.
-
Go to Apps -> My Apps -> Synchrony. Scroll down to Gateway Settings.
-
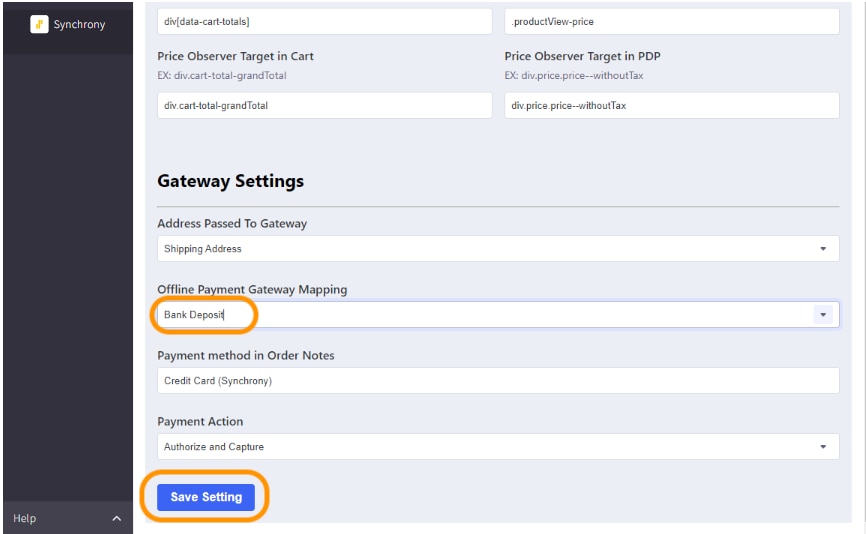
Select Bank Deposit from the Offline Payment Gateway Mapping dropdown.
Click on Save Setting button.
Uninstall Synchrony Plugin
Login to BigCommerce admin console.
Click on Apps -> My Apps.
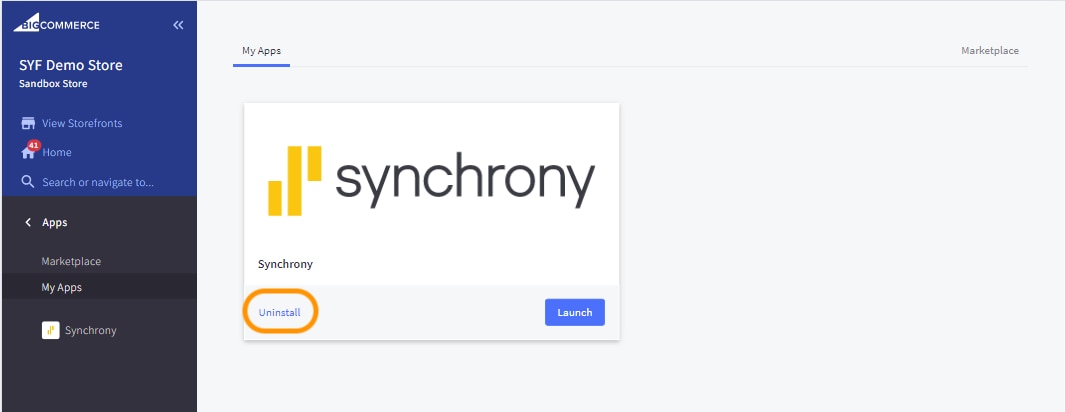
Click on Uninstall.