WooCommerce Set Up Guide
Introduction
WooCommerce is an open-source e-commerce plugin for WordPress that is used to create online e-commerce shops.
About this document
This document provides the steps to integrate the Synchrony payment extension into the installed WooCommerce site in WordPress. The Synchrony onboarding team will contact the merchant to discuss the steps required to go live. Merchants will not be able to configure or test the plugin without receiving Synchrony credentials. The final test and config require a scheduled time for live collaboration to finalize the Synchrony WooCommerce payment gateway.
Intended audience
This document is intended for the merchant and/or merchant development team to integrate the Synchrony payment extension to their application, and to use the applications for consumers to apply for and pay with Synchrony at checkout.
Terms and definitions
- Merchant: Merchant enrolled with Synchrony to provide financing and payment options.
- Merchant ID: A unique 16-digit identification number assigned to a merchant.
- Partner ID: A unique 10 alphanumeric code assigned to the partner.
- PDP: Product Display Page
- Widget: An element of a graphical user interface that displays information or provides a specific way for a user to interact with the operating system (OS) or an application.
- Authorization: The purchase was approved by Synchrony, and the merchant can prepare the merchandise for shipping.
- Captured: After the order is placed and approved by Synchrony Financing and when the order is shipped, the order is captured, and this begins the funding process, so the merchant gets paid.
Technical Support
For technical support related to the Synchrony payment app, send an email to eCommerce@syf.com.
High-Level Steps to Integrate Synchrony Payment Extension
The high-level steps to install and configure the Synchrony Unifi Extension app to Magento site is as shown:
- Start
- Login to WOO Commerce Admin Console on WordPress
- Add and install Synchrony Payment App
- Specify Partner ID, Client ID, Client Secret, and Other Configuration Settings
- Stop
Prerequisites
Before installing and configuring the Synchrony payment app to your WooCommerce site, make sure the following prerequisites are met:
- WooCommerce extension is installed in WordPress. For details, see Installing and Uninstalling WooCommerce.
Installing and Integrating Synchrony Payment App
To install the Synchrony payment app and integrate it into WooCommerce site:
- Log into your WooCommerce Admin Console.
- On the left panel, click Plugins.
- Click Add New. The Add Plugins page is displayed.
- Click Upload Plugin.
- Click Choose File and specify the plugin in a .zip format. The Synchrony payment app will be installed.
Configuring Synchrony Payment App
To configure the Synchrony payment app:
- Log into your WooCommerce Admin Console.
- Under WooCommerce on the left panel, click Settings.
- Click Payments. The Payment Methods are displayed and you can view Synchrony payment method as shown.
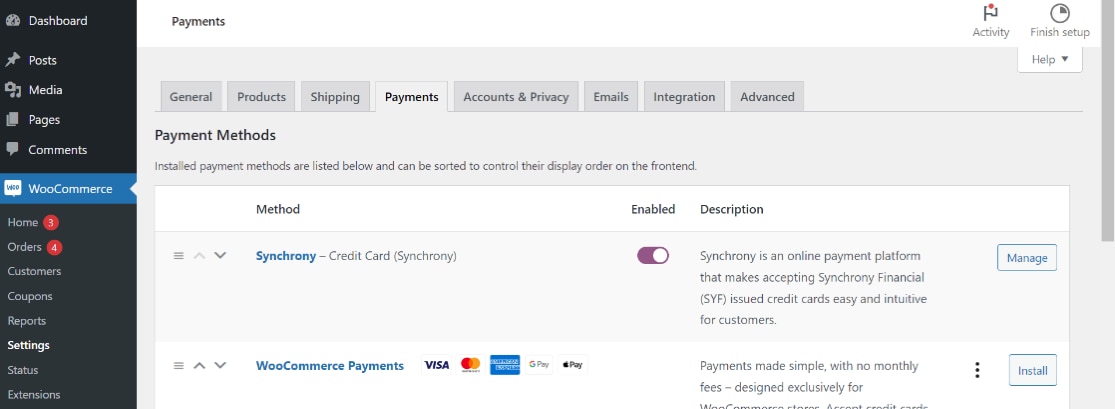
- Click Manage. The Synchrony page is displayed.
- Specify the following information:
- Enable Synchrony Payment: Select the Enable this payment gateway option.
- Title: Name for the payment method. By default, it is Credit Card (Synchrony). You can change it if you want to. This will be displayed in the payment method section during checkout.
- Logo: You can upload a custom logo.
- Payment Action: Select one of the following:
- Authorize: Allows authorization only. It will not capture the payment at the time of the order. Instead, payment must be manually captured in the form of an invoice.
- Authorize & Capture: Allows authorization and settlement in the same transaction. It will capture the funds immediately at the time of the order.
- Use Synchrony Sandbox: Select Yes.
- Partner Id, Client Id, and Client Secret: Provided by your Synchrony account representative.
- Display Area: Select the pages where you want the Synchrony payment app to display. The options are:
- All
- Product Page
- Cart Page
- Checkout Page
- Module Version: Displayed by default and it is read-only.
- API Request Timeout: Enter 30 as the timeout request for the API.
- Debug Mode: Select Yes to enable logs.
- Address Passed to Modals: Select Billing Address or Shipping Address.
- Send Error Log into Synchrony Server: Select Yes to send all error logs to Synchrony server.
- Cache Time Out: Enter a value for the cache timeout.
- Enable Synchrony Promotions: Select Yes if you want to include the promotional offers as a part of the payment option. Else, select No.
- Click Save Changes. The configuration settings are saved.
Upgrading Synchrony Payment App Version
For information about upgrading the Synchrony payment app version.
Effective Usage of Synchrony Payment App
This section provides information about promotions that you can use through Synchrony payment app. You can set it up on the WooCommerce site and then contact your Synchrony account representative to implement the requirements at the backend.
Promotions
Promotions are financing offers, such as 6 months deferred interest. Each promotion has a cost, which is expressed as the Merchant Discount Rate. This Merchant Discount Rate is subtracted from the funded amount of the purchase, and this amount represents the cost of financing provided by Synchrony. Merchants cannot pass on the cost of financing to consumers. Available promotions are determined by Synchrony.
A rate sheet was provided to you during enrolment and can be provided to you by calling 1-800-333-1082. The merchant can choose which promotions they add to their WooCommerce site, but it is required that all price points have a promotion available. We recommend that no more than five promotions be offered. The promotion that the consumer selects will be applied to the entire cart total, including shipping and taxes. To update promotions, send an email to eCommerce@syf.com.
Configuring Synchrony promotions is done through the WooCommerce backend with the assistance of your Synchrony account representative. It's extremely important to ensure that promotions are configured correctly to prevent errors from occurring during the customer sales experience. Work with your Synchrony account representative to validate your promotion setup because it is a critical step in ensuring that your store is properly setup.
Troubleshooting
Schedule a call with your account representative to review and test your installation prior to enabling the extension for production use. Your account representative can access Synchrony logs to verify and correct any misconfigurations.